Summary
You might have heard that Instagram Reels are a gold mine for helping brands grow following. The short, fun videos can be a fantastic way for brands to flex their creative muscles and build a visual experience beyond a grid post. This guide will teach you what Instagram Reels are and how to make them, share best practices on creating Reels, and show fantastic examples from others.

What are Instagram Reels and why should your brand use them?
Launched a couple of years ago, Instagram Reels are entertaining, full-screen vertical videos that can be up to 90 seconds long. Instagram users can edit, add audio, or add effects to the Reels before sharing them to their Feed, Stories, and the Reels explore page.
Since their introduction, the popularity of Instagram Reels has spread like wildfire and the buzz around Reels is increasing daily. According to statistics, Instagram Reels generate 67% more engagement than standard Instagram videos and more likes than TikTok posts.

How to make an Instagram Reels video for your brand
You can make your first Instagram Reels video in four easy steps:
- Access the Reels feature on Instagram.
- Record or upload your video.
- Edit your Reels.
- Share your Reels.
1. Access the Reels feature on Instagram
To access Reels, simply open the Instagram app, click the + button on the top right of the screen, and select Reel.
2. Record or upload your video
There are two ways you can gather footage for your Reels:
- Capture new footage by pressing and holding the round white recording button.
- Upload video footage from your camera roll by tapping the square image and + icon in the bottom left corner.

Reels can be recorded all at once or in a series of clips (one at a time). Specifically, during the recording, you can tap the record button to end a clip and then tap it again to start a new clip.
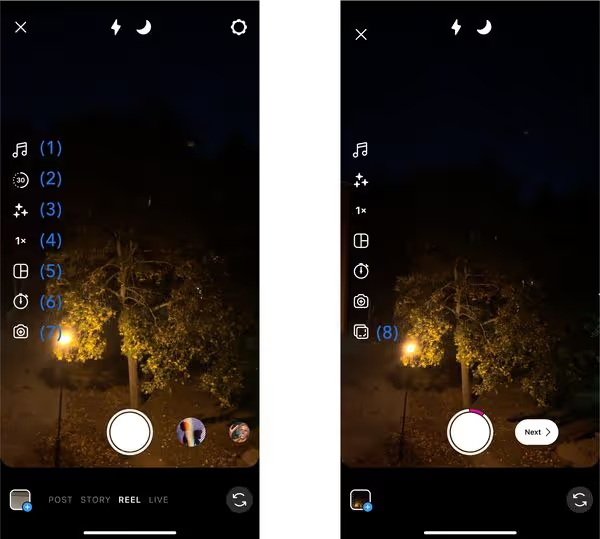
You’ll also see a variety of creative editing tools on the left side of your screen to help create your Reels, including:
- Audio (1) lets you select audio from the Instagram music library or import it from your device and add it to your video.
- Length (2) lets you change the length of your video. You can choose to make your video 15, 30, 60, or 90 seconds.
- AR Effects (3) allows you to select one of the many effects in Instagram’s effect gallery, created by Instagram and creators worldwide, to record multiple clips with different effects.
- Speed (4) allows you to change the speed of your video. For example, you can slow it down by choosing .3x or .5x or speed it up by choosing 2x, 3x, or 4x.
- Layout (5) lets you adjust the layout and add more than one recording to the frame.
- Timer (6) allows you to set a timer that will go off before you start recording and sets a time limit for the clip.
- Dual (7) lets you record videos using your front and rear cameras at the same time.
- Align (8) appears after you record your first clip. It allows you to line up objects from the previous clip, which helps to create seamless transitions between moments in your footage.
3. Edit your Reels
Once you have your footage, hit 'Next' to start editing. If you’re familiar with Instagram Stories tools, you’ll recognize most of these tools:
- Audio (1): In case you missed it earlier, you can add audio to your Reels at this stage. In addition to audio from the Instagram music library or your device, you can record a voiceover or add sound effects.
- AR effects (2): Search from Instagram’s endless gallery of AR effects created by Instagram and creators worldwide.
- Stickers (3): Include captions, GIFs, and a variety of fun Instagram stickers.
- Text (4): Add text to your Reels.
- Voiceover (5): Tap or hold to record audio over the video.
- Draw (6): Use the draw tool to add some extra flare.
- Filters (7): Swipe left/right to choose filters to add to your Reels.
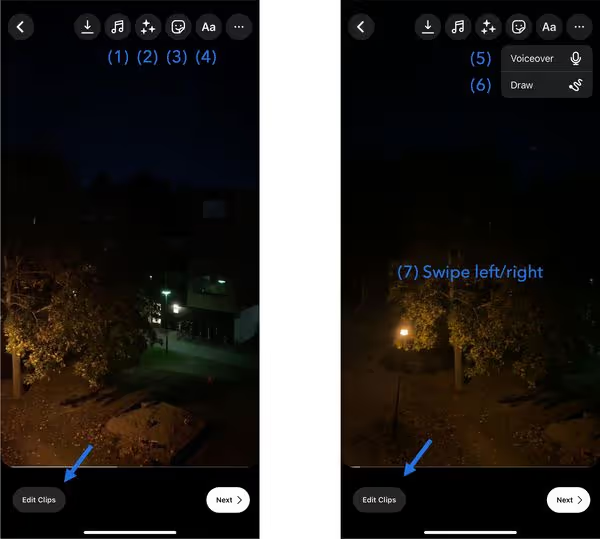
By tapping 'Edit clips' at the bottom left corner, you’ll then see all of your clips lined up at the bottom. Here, you can shorten, re-order, add, and delete your clips, and also add transitions between the takes.
4. Share your Reels
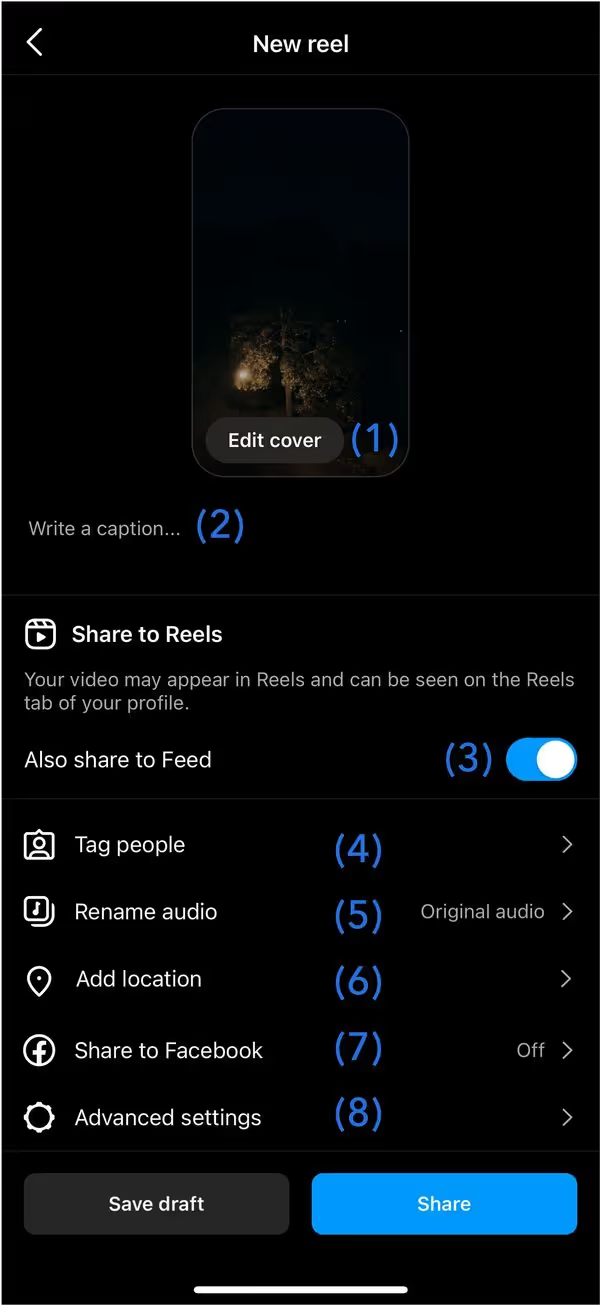
When you're ready, tap 'Next', and you will be able to:
- Choose a cover photo (1)
- Write a captivating caption that speaks to your Reels (2)
- Choose whether or not to share your Reels to your Feed (3). In my experience, sharing to the Feed increases your reach
- Tag people in your Reels (4)
- Rename your audio (5). If you add your audio or a voice recording to your Reels, you can give it a name that will show up in other users’ Reels when they use the sound.
- Add a location (6)
- Enable 'Share to Facebook' (7) to increase your reach
- Advanced settings (8). You can add paid partnership label, choose whether to show automatically generated captions or not and enable high-quality uploads.
Once your Reels video is finalized, you can publish it immediately or save a draft.
Best practices for creating viral Instagram Reels
Instagram Reels is a great way to get your business in front of the right audience, but this doesn’t happen automatically. So, the big question is how to make your brand’s Reels go viral. Here are the top three best practices for your Instagram Reels:
- Know how the Instagram Reels algorithm works
- Reels should be entertaining and authentic
- Post consistently and share your Reels on many platforms
1. Know how the Instagram Reels algorithm works
Understanding how the Instagram algorithm works can help you get more views from the Explore page and the Reels tab.
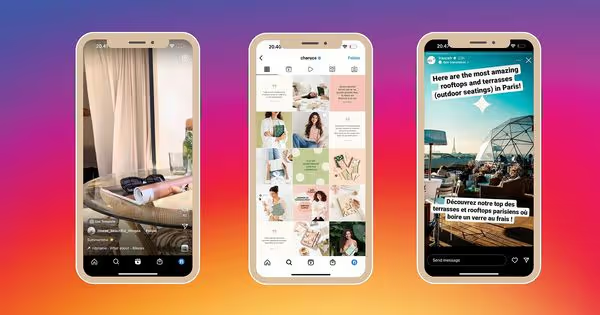
More specifically, the Instagram algorithm favours Reels that:
- Have a high engagement, such as comments, likes, shares, saves, and watch time.
- Use creative tools like on-screen text, filter, or AR effects.
- Use trending audio.
- Get creative with transitions.
- Include 3-5 relevant hashtags.
On the other hand, the algorithm does not favour Reels that:
- Are blurry due to low resolution. To retain the highest video quality, you can upload your Instagram Reels with a resolution of 1080 x 1920 pixels.
- Are uploaded with a border around them.
- Do not meet Instagram’s Community Guidelines.
- Are visibly recycled from other apps, for example, containing logos or watermarks.
2. Reels should be entertaining and authentic
Brands can engage with audiences by sharing positive, entertaining videos that inform, entertain, or make people say “wow!”.
For example, you can allow your audience to look behind the scenes and how your product is made. Or show a fun side of your business and ask your staff to share their favourite menu hacks. Creating challenge videos is another fantastic option, and it’s one of the most popular content types. Also, it’s essential to keep on track with what is trending right now and creatively bring that into your brand niche.
3. Post consistently and share your Reels on many platforms
The Instagram algorithm currently favours Reels, so consistently posting is one of the best things you can do to improve your Reels performance. Instagram is recommending brands to post from five to seven Reels a week. Besides consistent posting, you should also share the same video to your Feed and Stories to increase the reach of your Reels.

LG FR takes this further by showing a curated Instagram wall of branded images, videos, Stories, and Reels on their website. By embedding Instagram feeds on websites, brands grow followers and increase engagement for their Instagram content, especially Reels.
Are you looking to embed Instagram Reels and other Instagram posts on your website? With Flockler’s free trial, you will get a live Instagram feed embedded on any website in a few minutes.
3 inspiring Reels examples for your brand
Romantik Hotels: Show products and services in action
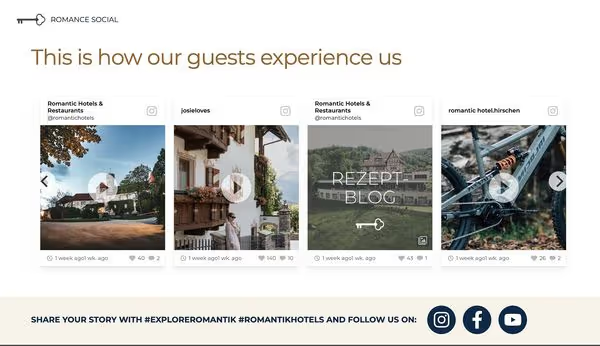
Romantik Hotels encourages customers to share their vacation moments, experiences, and feedback with the branded hashtags #exploreromantik and #romantikhotels. With the help of positive feedback made by customers on social media channels, the hotel is reaching out to travellers looking for a destination to spend their holiday.

Furthermore, Romantik Hotels embeds a feed on their website showing posts and videos made by the customers and influencers using their hashtags. The Instagram hashtag feed helps the hotel to add social proof to the homepage, build trust, and increase the reach and brand recognition on social media channels.
For more inspiration, check examples of travel brands adding social proof to their websites.
Does your brand already show customer reviews on websites and other digital services? Sign up for Flockler’s 14-day free trial and add customer reviews to your pages.
Social Chain: A behind-the-scenes peek
These short and snackable behind-the-scenes clips offer a unique opportunity for you to show your brand to the public and highlight your products, services, and personality in an authentic way.
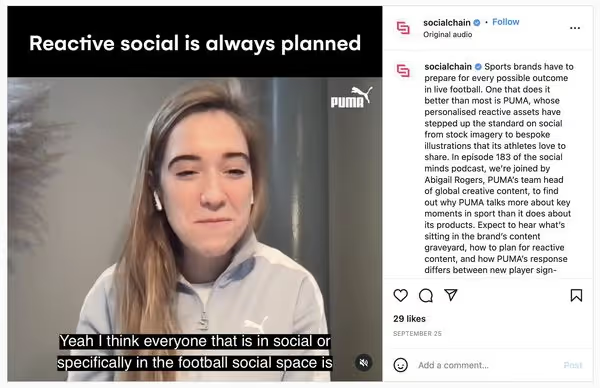
In this Reel, the social media agency Social Chain takes us behind the scenes of their work with PUMA. By allowing us into the fold of how they help PUMA in various stages of their content creation process, the agency is showing us its extensive expertise, in-depth industrial knowledge, and perfect execution and collaboration with its clients.

Moreover, as Social Chain's primary service is to help brands capture the value of Instagram, TikTok, etc., it comes as no surprise that an Instagram feed is an integral part of their website. With Flockler, they gather behind-the-scenes Reels videos and work-related photos and display them on the website. The stunning Instagram wall increases the time spent on the site and encourages visitors to learn more about Social Chain's services.
GoPro: Share user-generated content
GoPro is one of many brands that gather customer reviews with the #GoProAwards campaign. Specifically, they ask their most active customers to share a photo, video, or Reels taken with the GoPro camera.
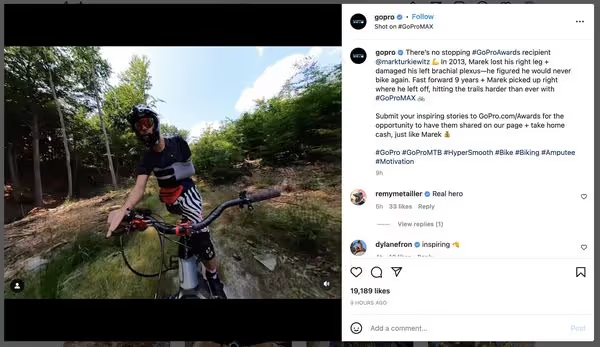
The best entries are shared with the branded hashtag on their official Instagram account. Sharing UGC opens conversations between GoPro and the customers, builds an engaged community, and attracts new customers.
Learn some of the best practices through 7 inspiring user-generated content campaign examples.
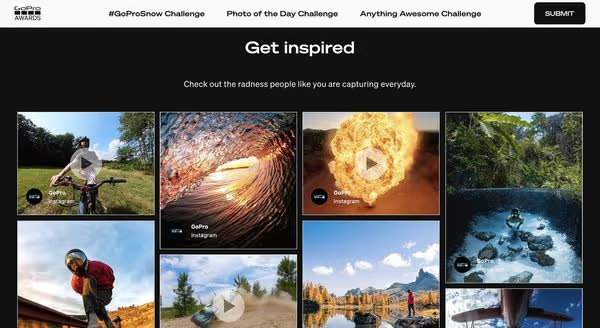
Then, GoPro displays user-generated content in a beautiful stream on their website with the help of Flockler. The stunning social media wall increases the time spent on the site and encourages visitors to learn more about GoPro's products.
Are you looking to run user-generated campaigns for your brand? Sign up for a free trial with Flockler and embed user-generated content on any website within minutes.
.png)
